- Accessing the CMC Portal
- Class Lists
- Low Grade Notifications (Academic Advisories)
- Viewing Your List of Advisees
- Clearing Advisees to Register
- Viewing Advisee Degree Audits
- PERMission System
- Entering Grades
Accessing the CMC Portal
Click here to log into the CMC portal, or select “CMC Portal” from the faculty gateway on CMC's website. If you aren't automatically logged in, you can use the Login box in the upper right hand corner. If you have never logged into the portal before, or need help with your account, contact the Help Desk (909-607-0911). You can reset your password online yourself if you don't remember it.
Class Lists
Faculty can use the portal to see their class rosters. Log into the portal, then go to the “Faculty” tab on top. Here, you can see all your courses listed.
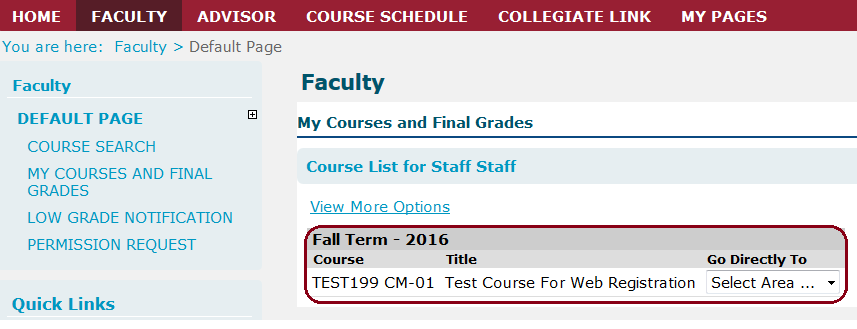
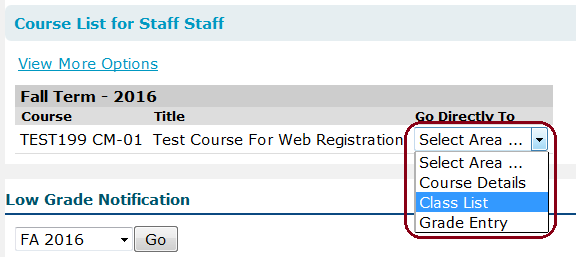
In the dropdown menu where it says “Select Area …”, you can choose “Class List” to see the students currently enrolled in a course you are teaching. This will produce a list of your students and relevant information pertaining to them. You have options to email the class and generate an Excel spreadsheet if you would like.
Low Grade Notifications (Academic Advisories)
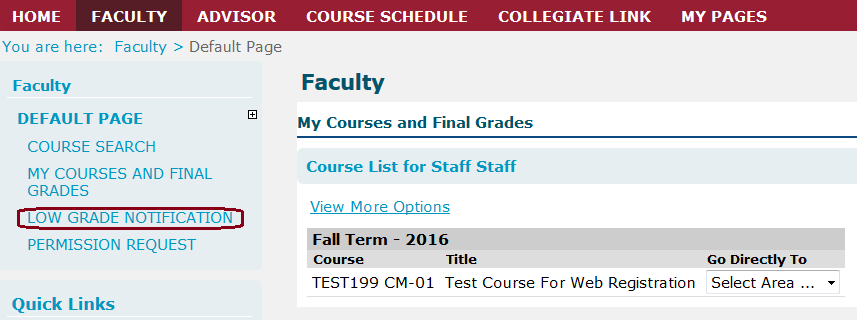
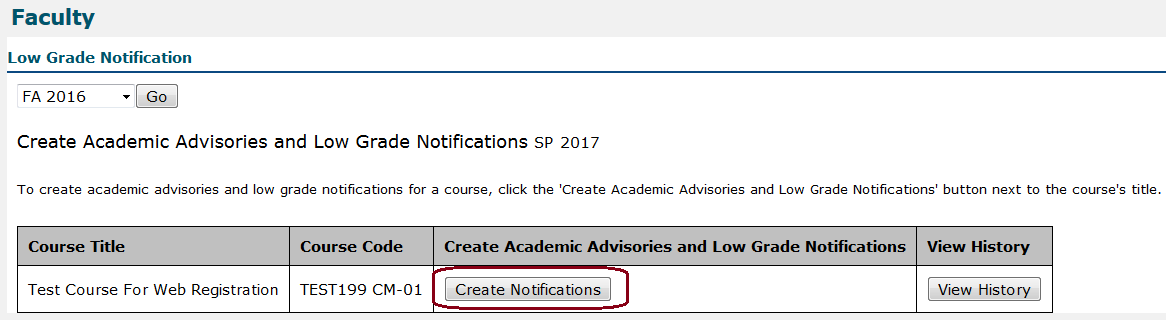
Low Grade Notifications (also called Academic Advisories) should be issued for any students whose cumulative work is at a C- (5.0) or below. On the sidebar on the left side of the portal, select “Low Grade Notification”.
The Low Grade Notice section of the portal includes an area for you to type in comments for your students. These comments are emailed along with the grade information to students and their advisors. Click where it says “Create Notifications” next to the course code. You can then enter grades, reasons, and comments for each student who should receive a notice. Go to “Submit All Notices Created", then proceed through the confirmation screens to finalize the process.
Viewing Your List of Advisees
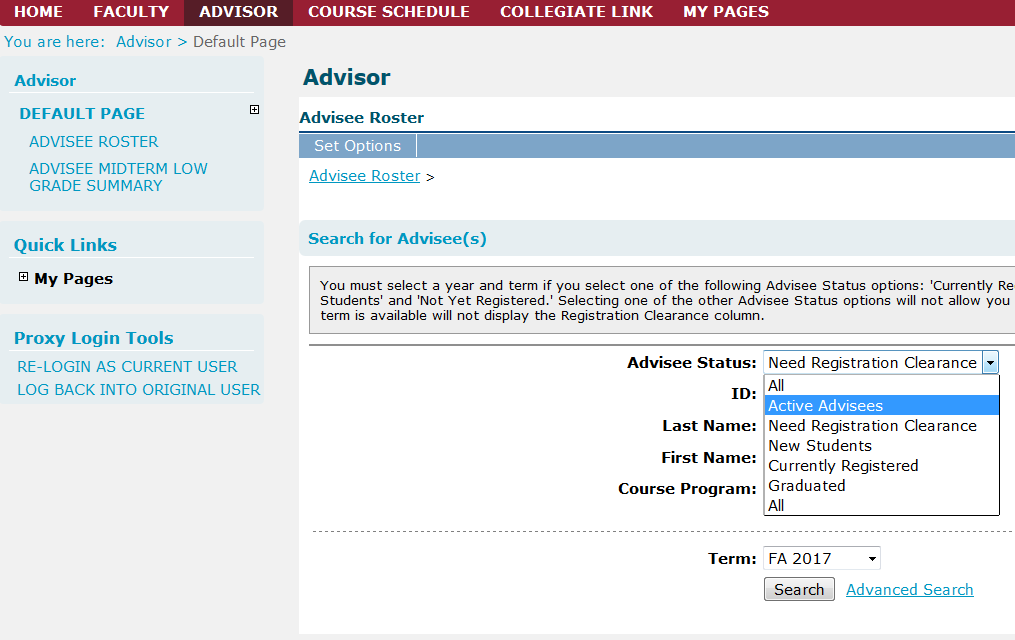
As an advisor, you have permissions to view student data about your advisees, including the student’s program information, transcript, schedule, and biographical details. Log into the portal and then go to the “Advisor” tab on top. From the “Advisee Status” dropdown menu, you can choose from several different options.
Selecting “Active Advisees” and clicking on the Search button will produce a list of all your advisees currently enrolled at CMC. Here, you have the option to email all your advisees or generate an excel spreadsheet with their information.

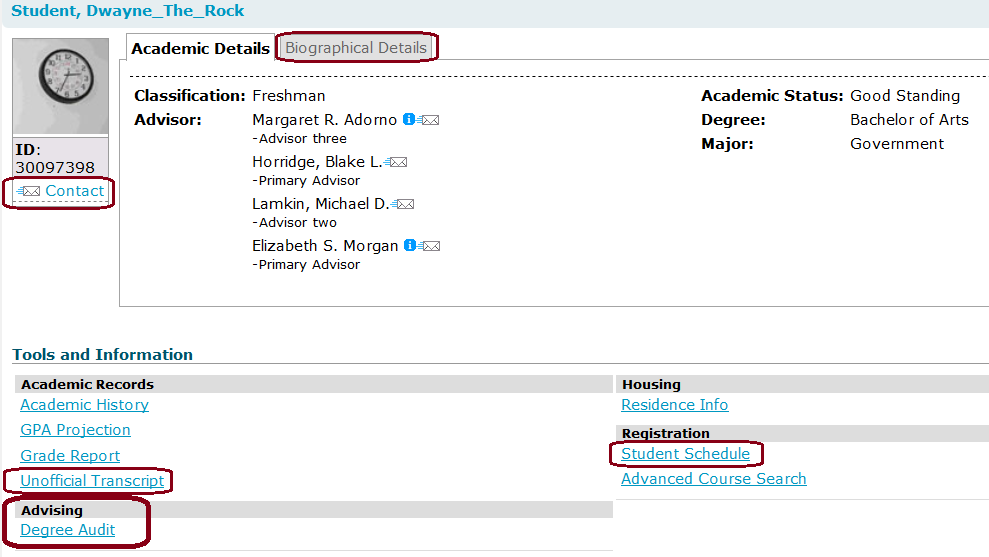
Click on an individual student to see their information in more detail. In this window, you can see your advisee’s basic student program information. Other useful options are the unofficial transcript, current schedule, and biographical details (including address and phone). Also, there is an email flyout underneath the student’s photo that will enable you to send them an email.
Clearing Advisees to Register
All students need to be cleared to register by an academic advisor before they can register for courses. It is the responsibility of all students to engage their advisors to obtain clearance. On the faculty portal, you can view your current advisees and clear them for registration. Log into the portal, and then go to the “Advisor” tab on top. Here, you can see all your advisees. Next to “Advisee Status”, you can select “Need Registration Clearance” from the dropdown menu and click “Search” to view your advisees that still need clearance.
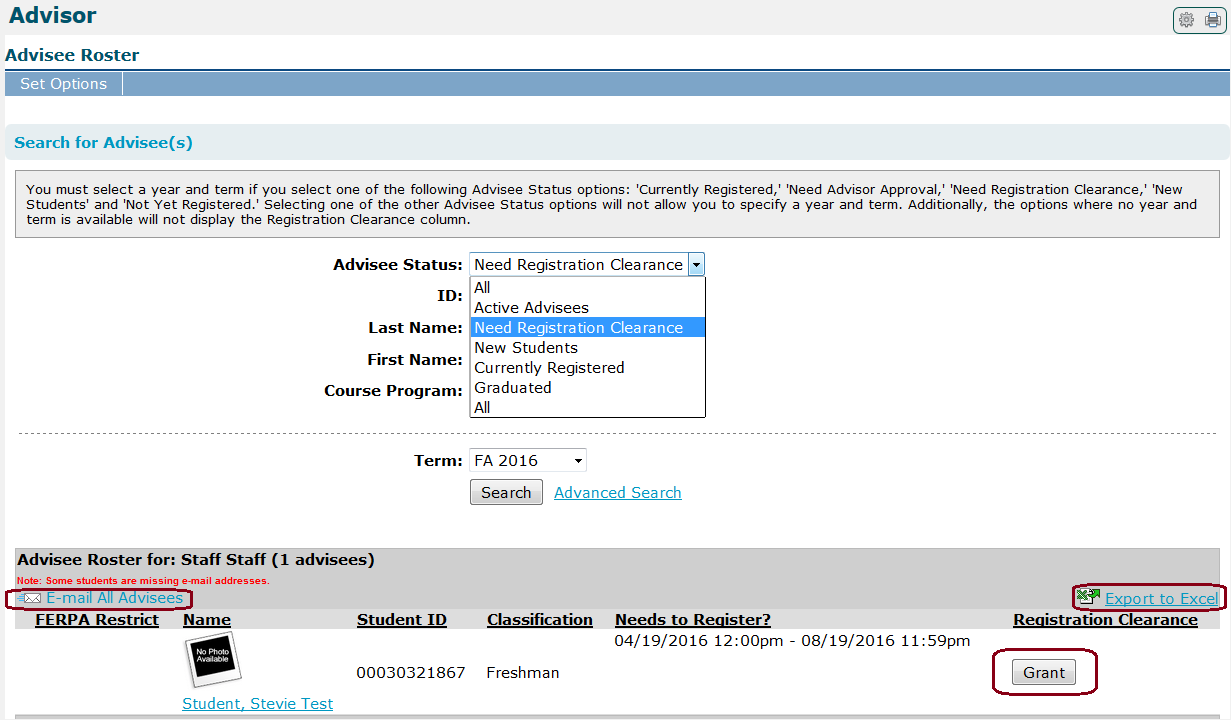
Here, you will see a list of your advisees who need clearance for the up-coming semester along with each student’s pre-registration appointment day/time. In the column headed “Registration Clearance” you will see one of two buttons: “Grant” or “Remove”. To grant clearance, click on the “Grant” button next to the student’s name. You can also remove clearance by clicking on the “Remove” button. A student can be cleared by any of their advisors, so if an advisee of yours is already cleared in your list, most likely it is because another of their advisors has already cleared them.
Viewing Advisee Degree Audits
Using the degree audit module, you can see your advisees’ progress toward completion of their graduation requirements on the CMC portal. When looking at the details of one of your advisees, you will see a “Degree Audit” link. After you click it, you will see your advisee's basic information in the Degree Audit Summary.
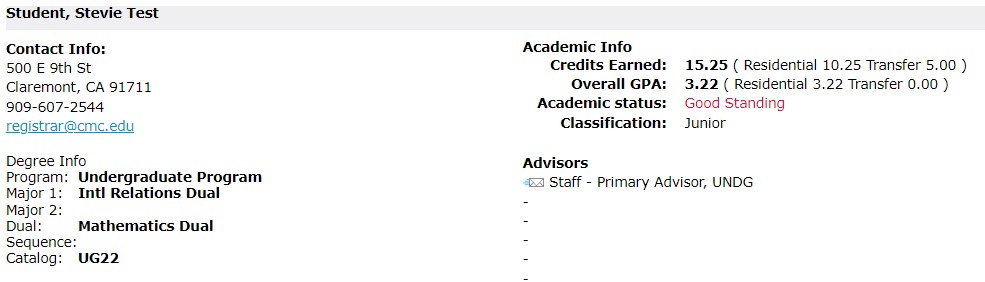
Below this, you can find the components of your advisee’s degree audit
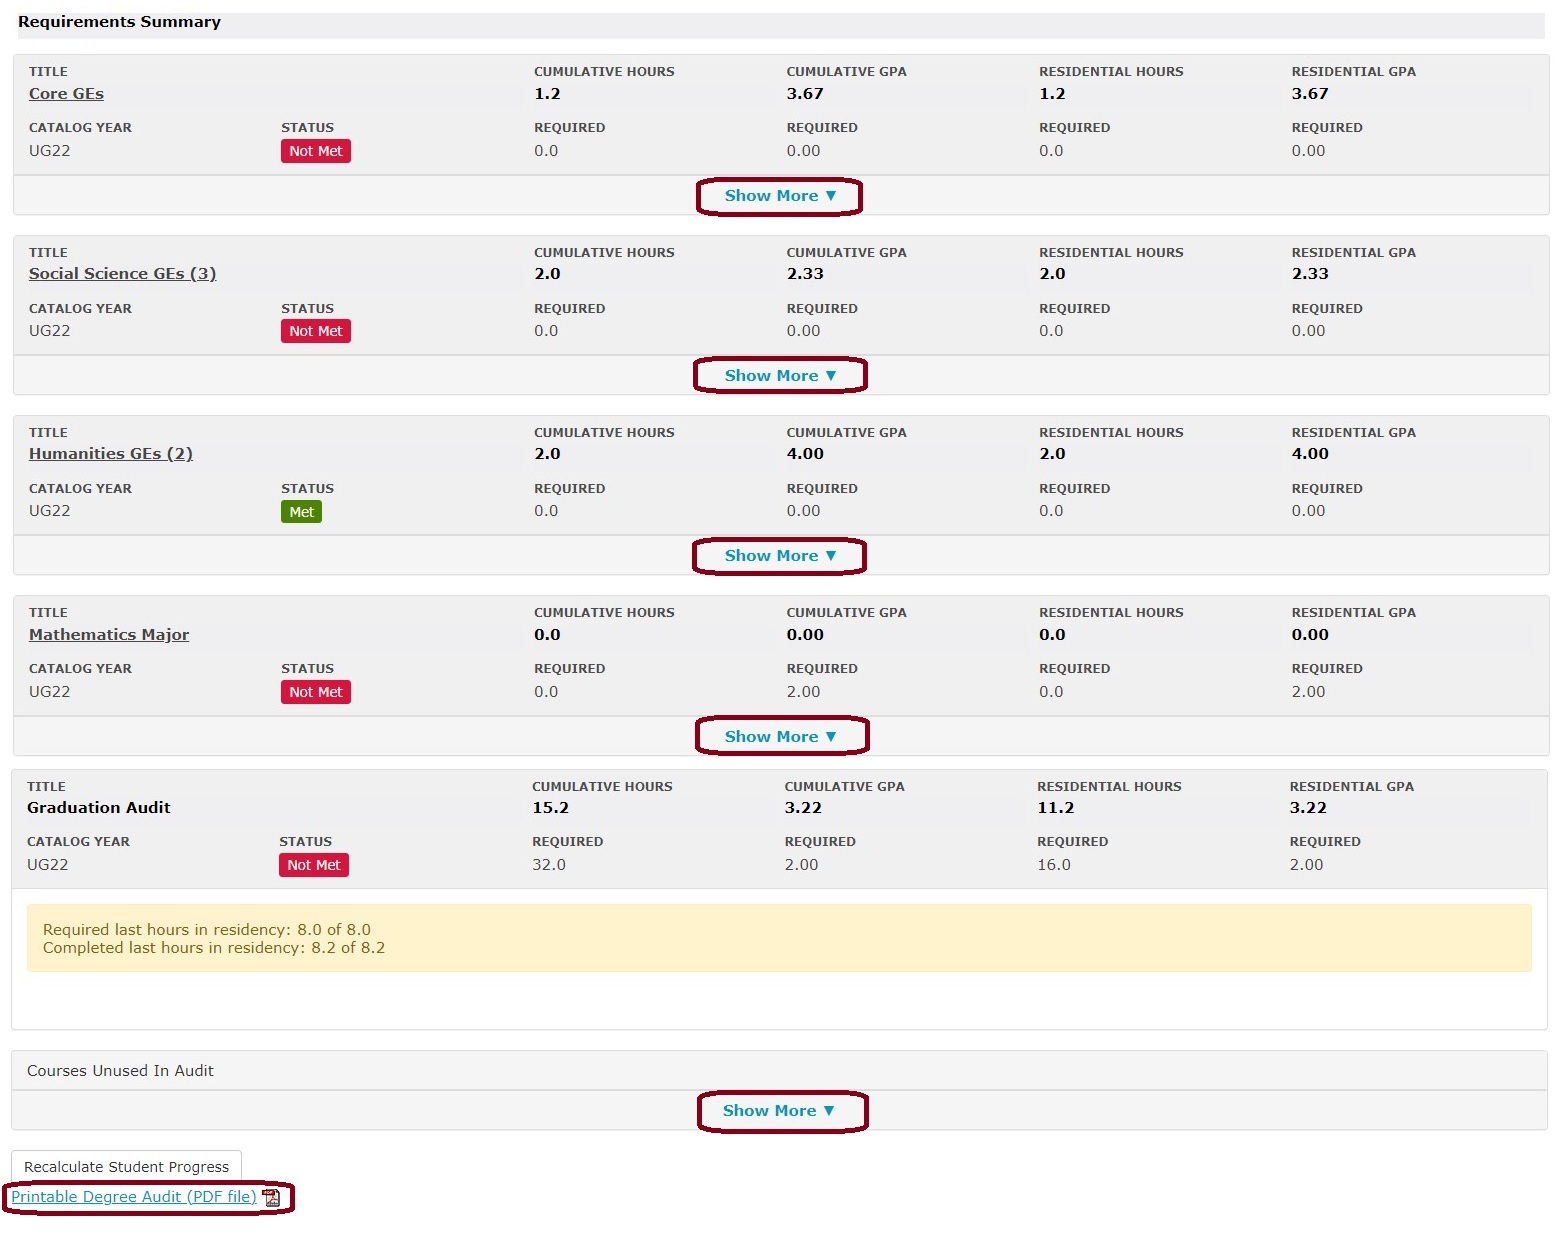
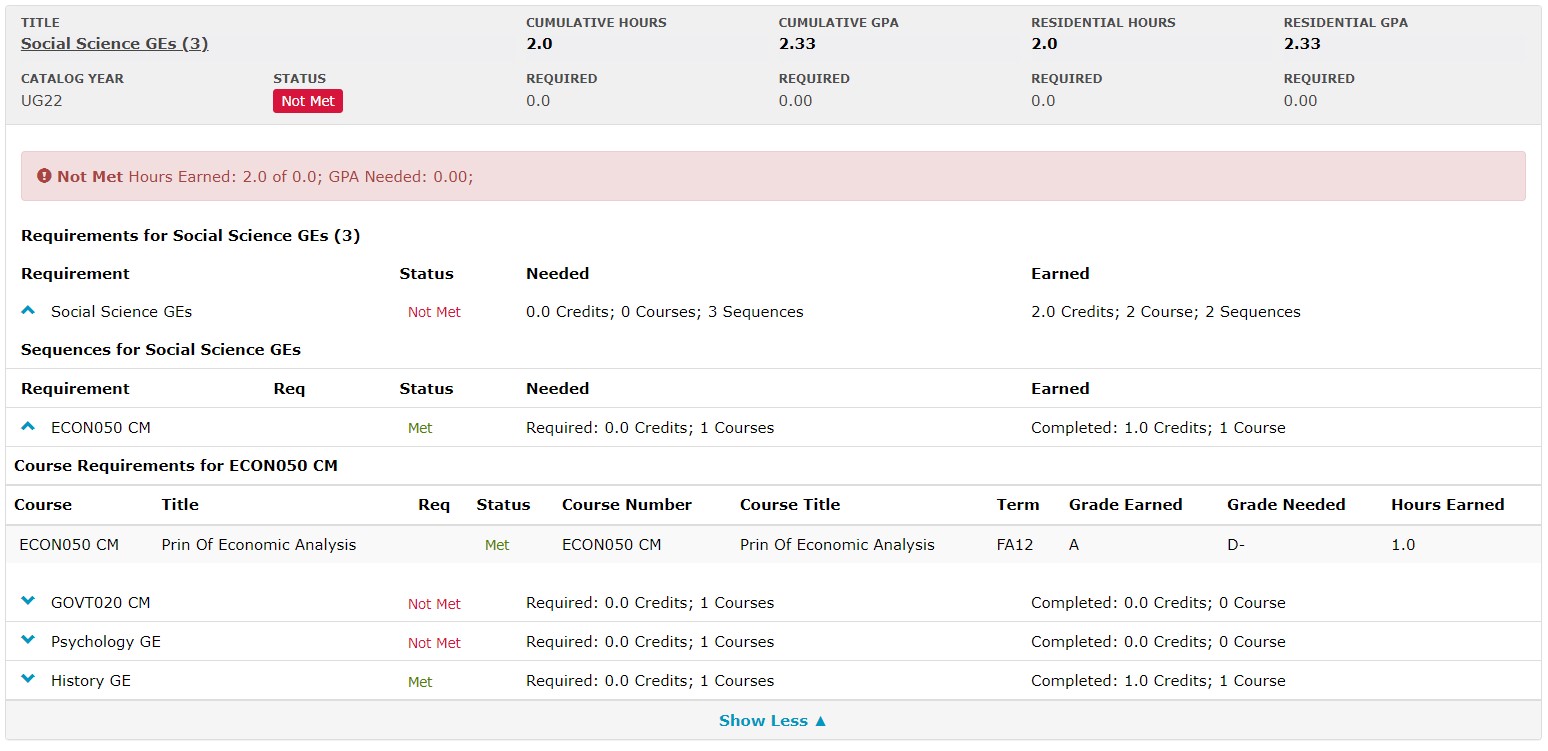
To view the details of one of these audit components, click "Show More" to expand that section. Here, you can see which requirements are satisfied and which are not. If you wish, you can further expand the degree audit to see which courses satisfied a requirement, and what the student’s grade was. You can also print a degree audit by clicking the “Printable Degree Audit” link at the bottom of the page.
PERMission System Tutorial
Processing PERMs
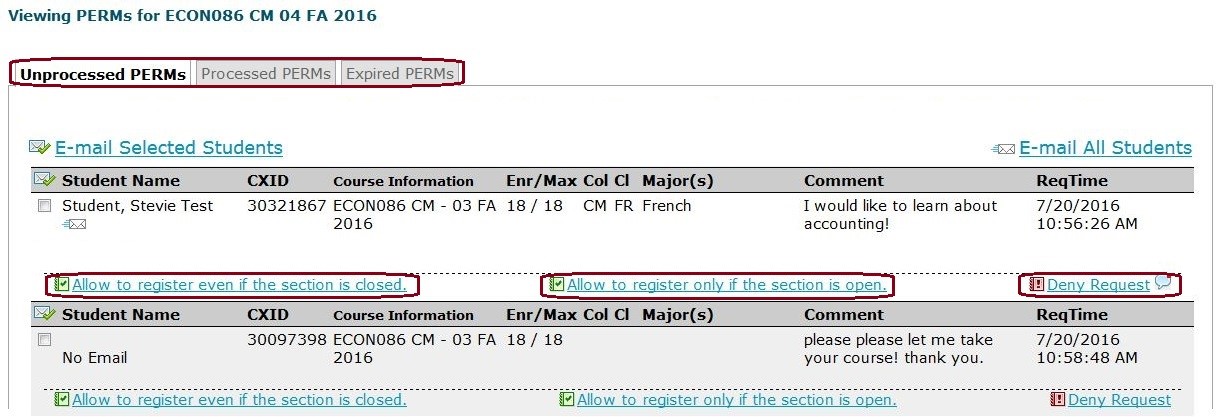
The PERM system enables students to request permission to enroll in courses that they otherwise are not authorized to add. Courses at the Claremont Colleges are very often restricted based on a variety of factors: they can be closed to students of a certain college, major, class standing, et al. In some cases, courses are closed to all students, requiring everyone to request permission to add the class. Any student may submit a PERM for any course that they are not authorized to add; students can always ask for permission, and handling those requests is at your discretion.
On the portal, PERM requests accumulate in the “Permission Request” section, under the Faculty tab. Here, all courses you teach are listed, and you can view all the PERMs that have been submitted for each class by going to “Process PERM Requests”.
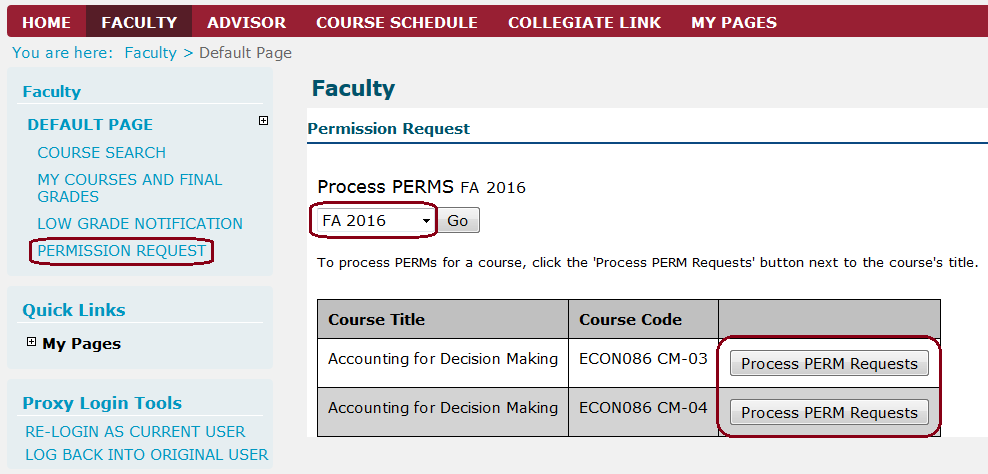
Depending on when you access the portal, the default session may be set to the fall or the spring (e.g. FA 2018 or SP 2019). If you access your PERMs and the courses you are teaching are not showing up, check and make sure you are in the correct semester.
For each class, there are three tabs: unprocessed PERMs, processed PERMs, and expired PERMs. For each PERM, you have three options:
- Allow the student to register even if the section is closed. Choosing this option allows the student to enroll whether the course is open or closed. Most CMC courses have overflow seats: these are seats that students can only take a PERM. You may grant them as you wish. Selecting this permission allows the student to take one of those overflow seats, if necessary.
- Allow the student to register only if the section is open. Choosing this option allows the student to enroll, but only if there is an open “non-overflow” seat. If the course is full, but overflow seats still exist, a student with this authorization will not be able to add the course.
- Deny the request.
Note that the total number of seats in the course (open seats and overflow seats together) is determined by department chairs and the Dean of the Faculty. You cannot add more seats to your course through the PERM system; you would have to talk to the aforementioned parties about increasing the number of seats in the class.
Setting an Expiration Date (Optional)
When you make a decision, you will see a confirmation page before you submit. Here, you may set an expiration date if you would like: a date by which the student must act on the PERM request, after which the PERM expires. For example, you may choose to allow a student to add the class only during registration week; in this case, you would set the PERM to expire the day after registration closes. Keep in mind that during registration week, all students have different 24-hour windows during which they are able to add courses, so setting a PERM to expire before the student’s registration period would be effectively the same as a denial. Setting an expiration date is optional; PERMs do not expire unless a date is entered.
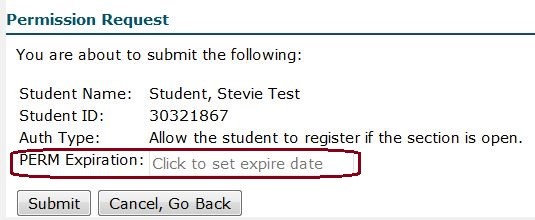
When entering an expiration date, use the format YYYY-MM-DD.
Changing your PERM Decisions
After you make your decision, the student’s PERM will move to the “Processed PERMs” tab. There, you may upgrade, downgrade, or revoke PERMs at any time.
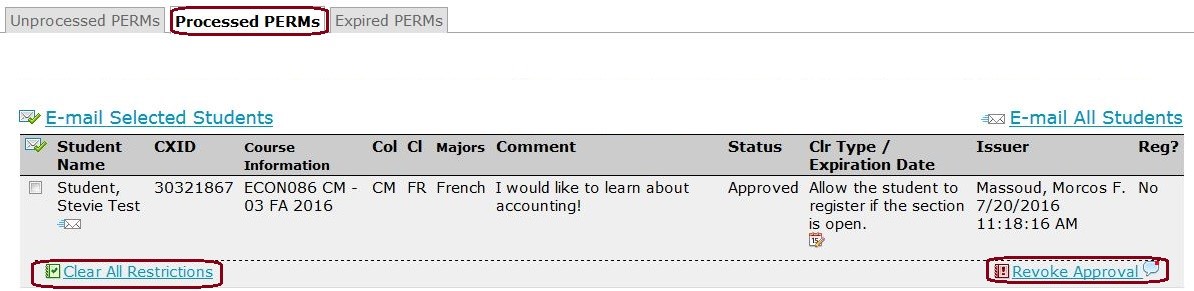
In the above example, the student was given permission to enroll only if the section is open. The remaining options are to clear all restrictions (allow the student to add even if the course is closed), or to revoke approval. You may also set an expiration date here if you would like, although after a PERM expires, it becomes useless; it does not revert back to its original PERM type. If you decide to revoke a PERM, the entry will move to the “Expired PERMs” tab permanently. If you change your mind, the student will have to submit a fresh PERM.
The PERM system auto-generates emails to both student and instructor when a new PERM is submitted, processed, or changed. Also, all PERMs come with email links, allowing you to initiate an email exchange with the student if you wish to discuss the PERM.
Entering Grades
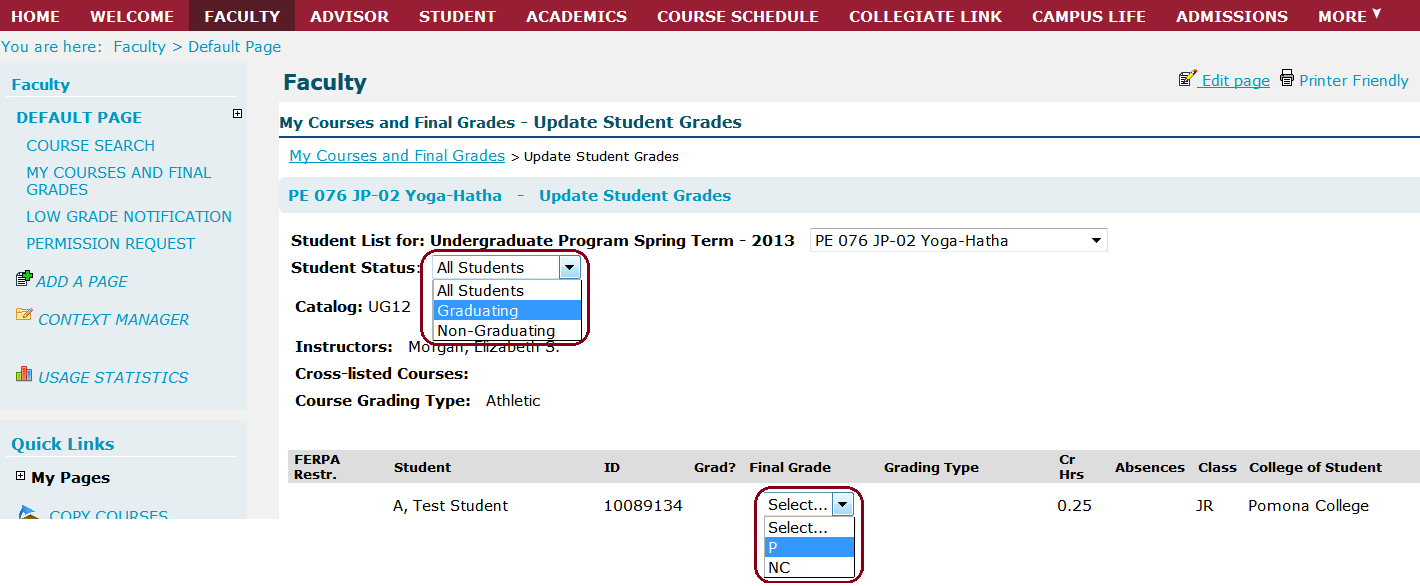
You can enter all grades, including thesis grades, on the portal. Remember that in the spring, senior grades are due before final exam week. Under the "Faculty" tab, choose your course, click the dropdown menu where it says “Select Area …”, and choose “Grade Entry”.
In the spring semester, you will have the option to select graduating, non-graduating, or all students on your grade roster. Select the group you wish to grade. Then click on the drop-down box in the “Final Grade” column next to each student’s name to enter the appropriate grade. Only the grades which are available for that student will appear as options.
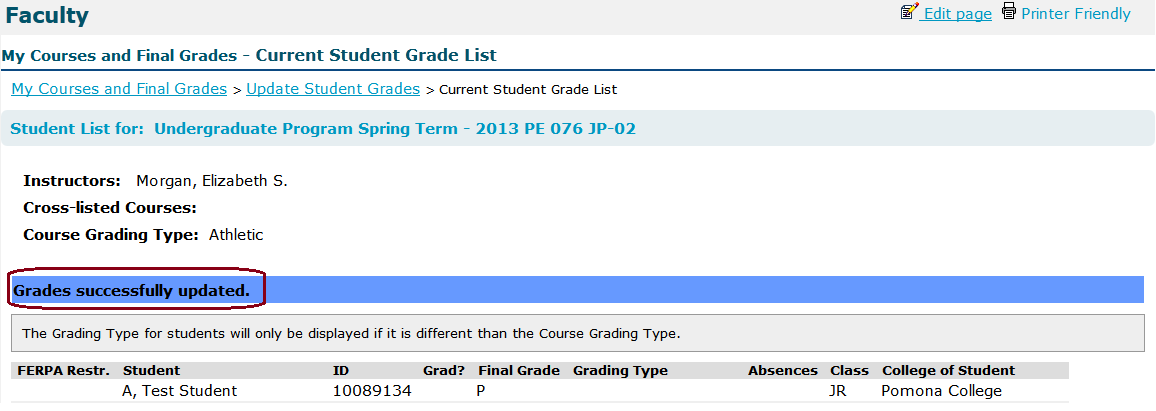
When you finish entering grades, click on the “Save” button in the lower left corner of the screen, then you will see a “Please Wait” message while the grades are transmitted. After this message clears, you should see a list of the grades that were successfully updated. You will also receive a system-generated confirmation email in your CMC email account verifying that the grades were submitted.